Table of Contents
What is this
alited stands for "a lite editor".
The main features of alited are:
Edited by alited are Tcl/Tk files. The C/C++ code is another target of alited, still for development of Tcl/Tk projects all the same.
alited facilitates the development and the maintenance of Tcl/Tk code, particularly because of the unit tree being a sort of documentation.
alited is suspected of being very good with large Tcl/Tk projects, i.e. when, in one session, you deal with 30-40-50... Tcl/Tk scripts, to say nothing of others.
It's quick at starting.
It's quick at switching projects.
It's quick at organizing Tcl/Tk code.
It's quick at navigating Tcl/Tk code.
It's quick at searching Tcl/Tk code.
It's quick at writing Tcl/Tk code.
It's quick at testing Tcl/Tk code.
It's quick at saving Tcl/Tk code.
It's quick at maintaining Tcl/Tk code.
Briefly, alited is totally quick, being at that a pure Tcl/Tk application.
For a quick acquaintance of alited, a few of demo videos are available:
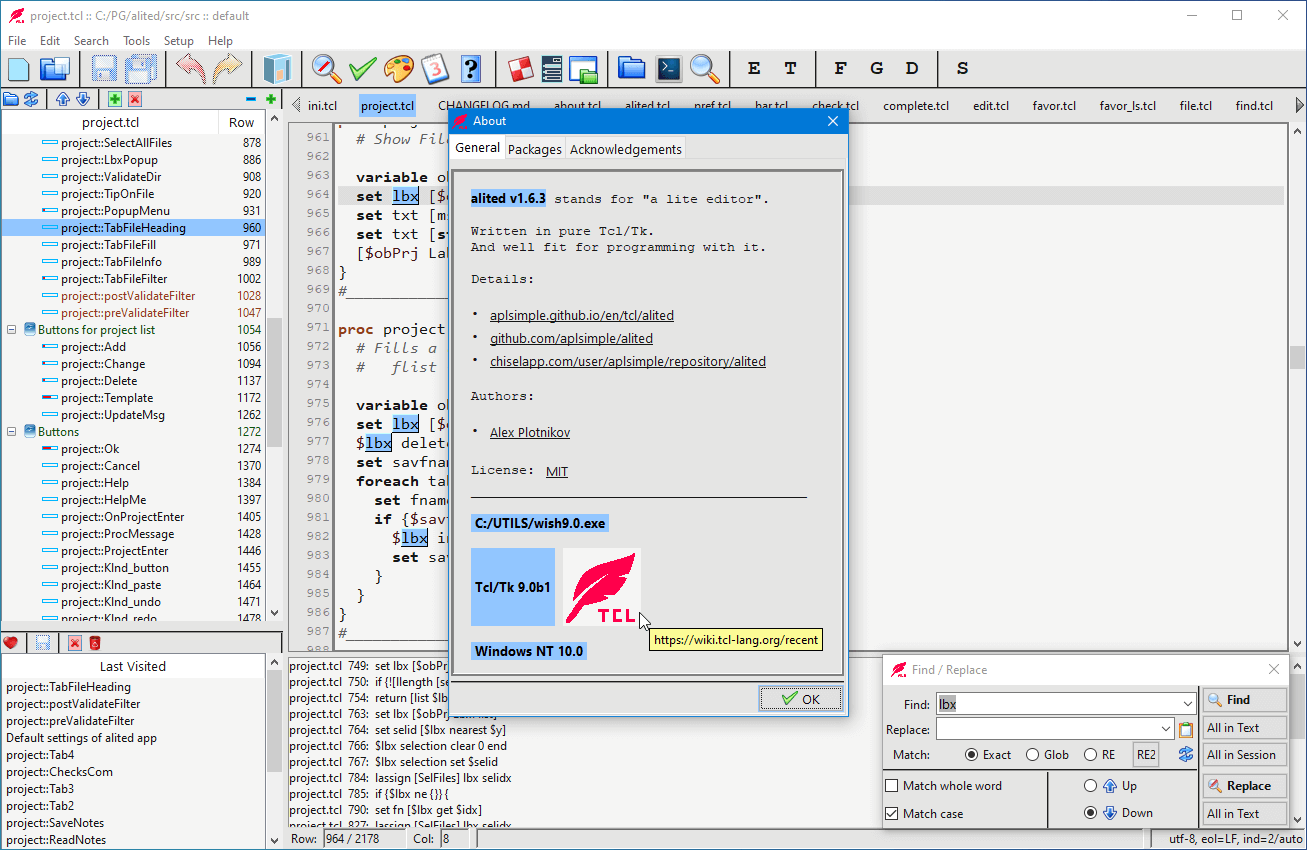
Below is a screenshot of alited:
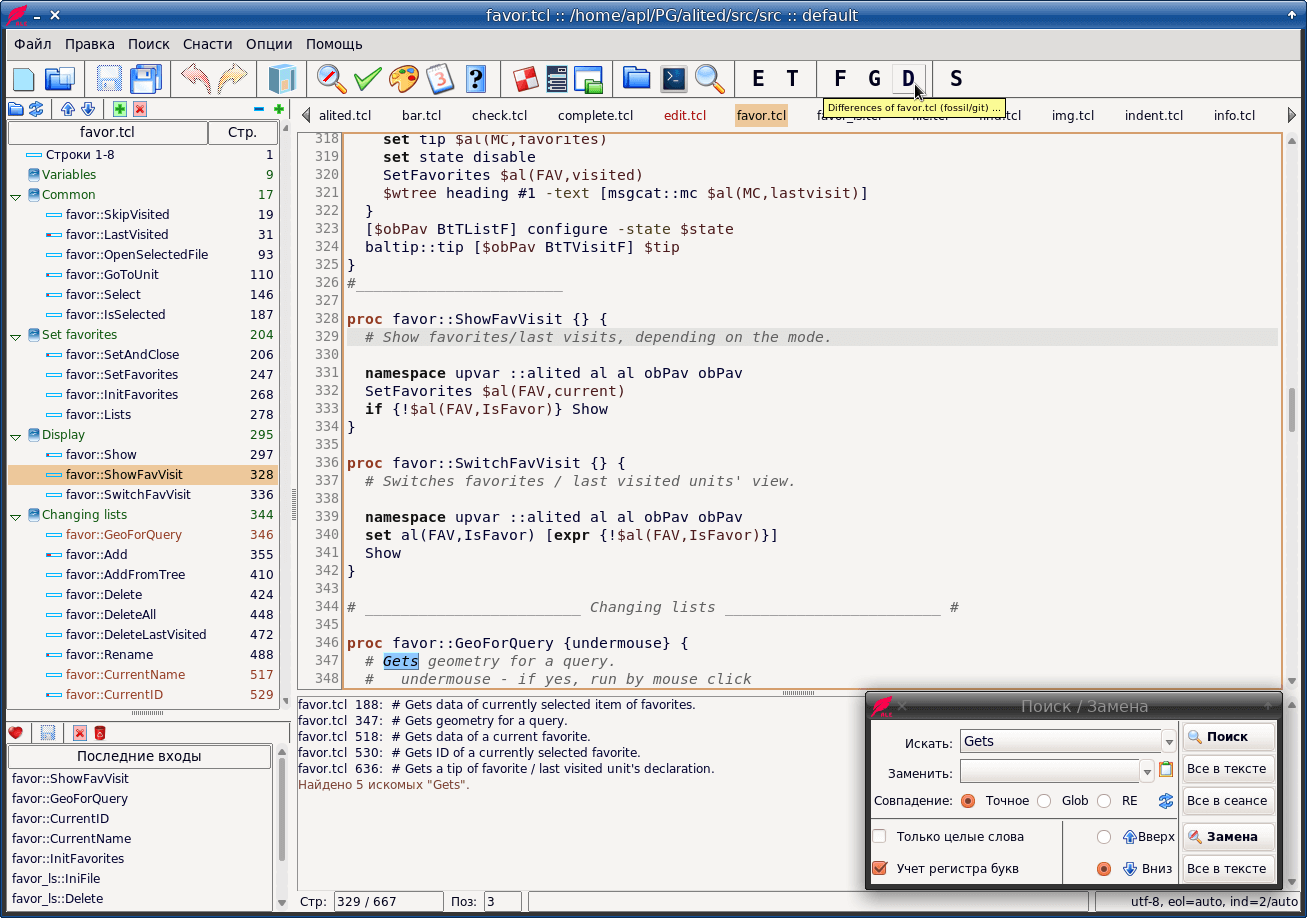
... and its localized and themed variant:
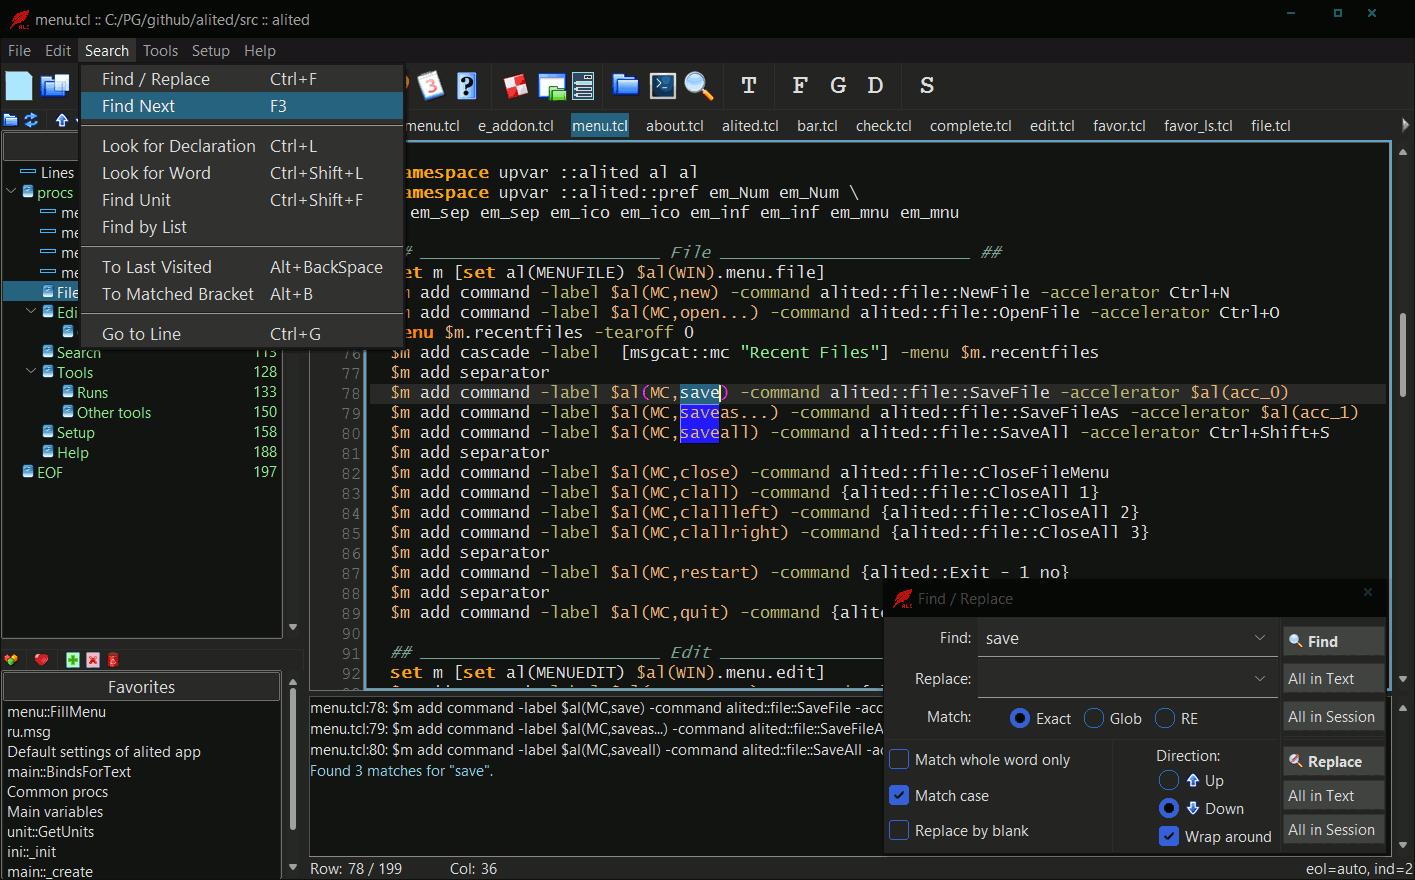
... and its dark theme on MS Windows 10:
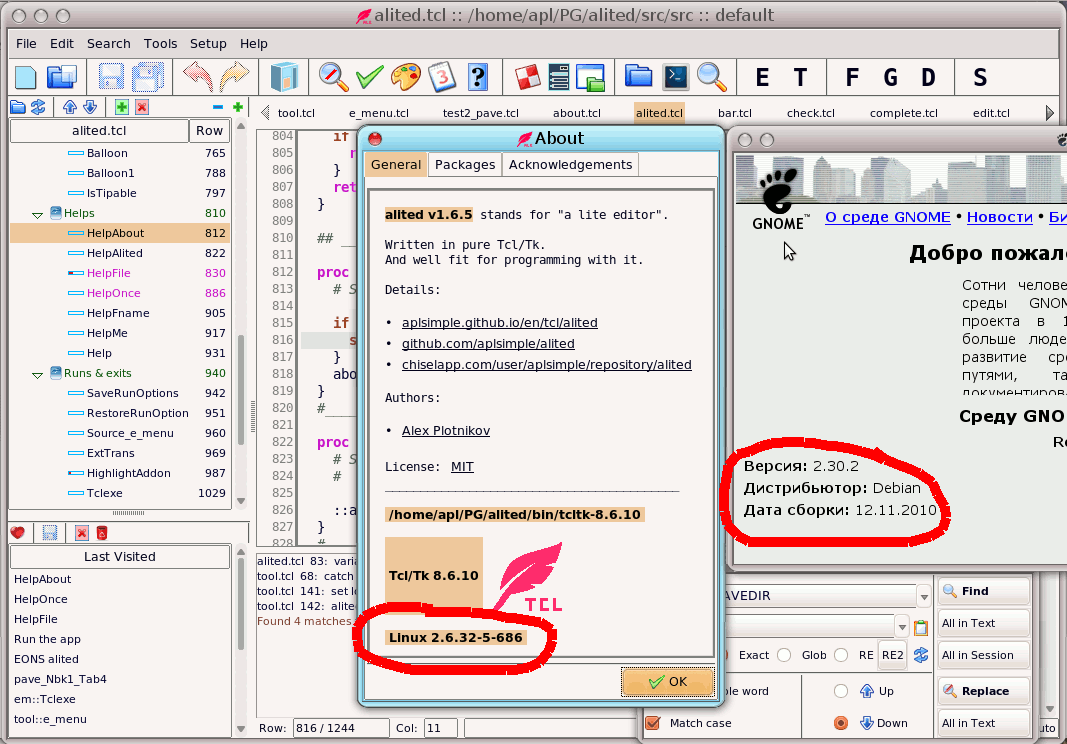
... and its 1.6.5 version installed 24.01.2024 on x86 machine with Debian v6.0 (Linux core v2.6.32) and GNOME v2.30.2 deployed far back in 2010:
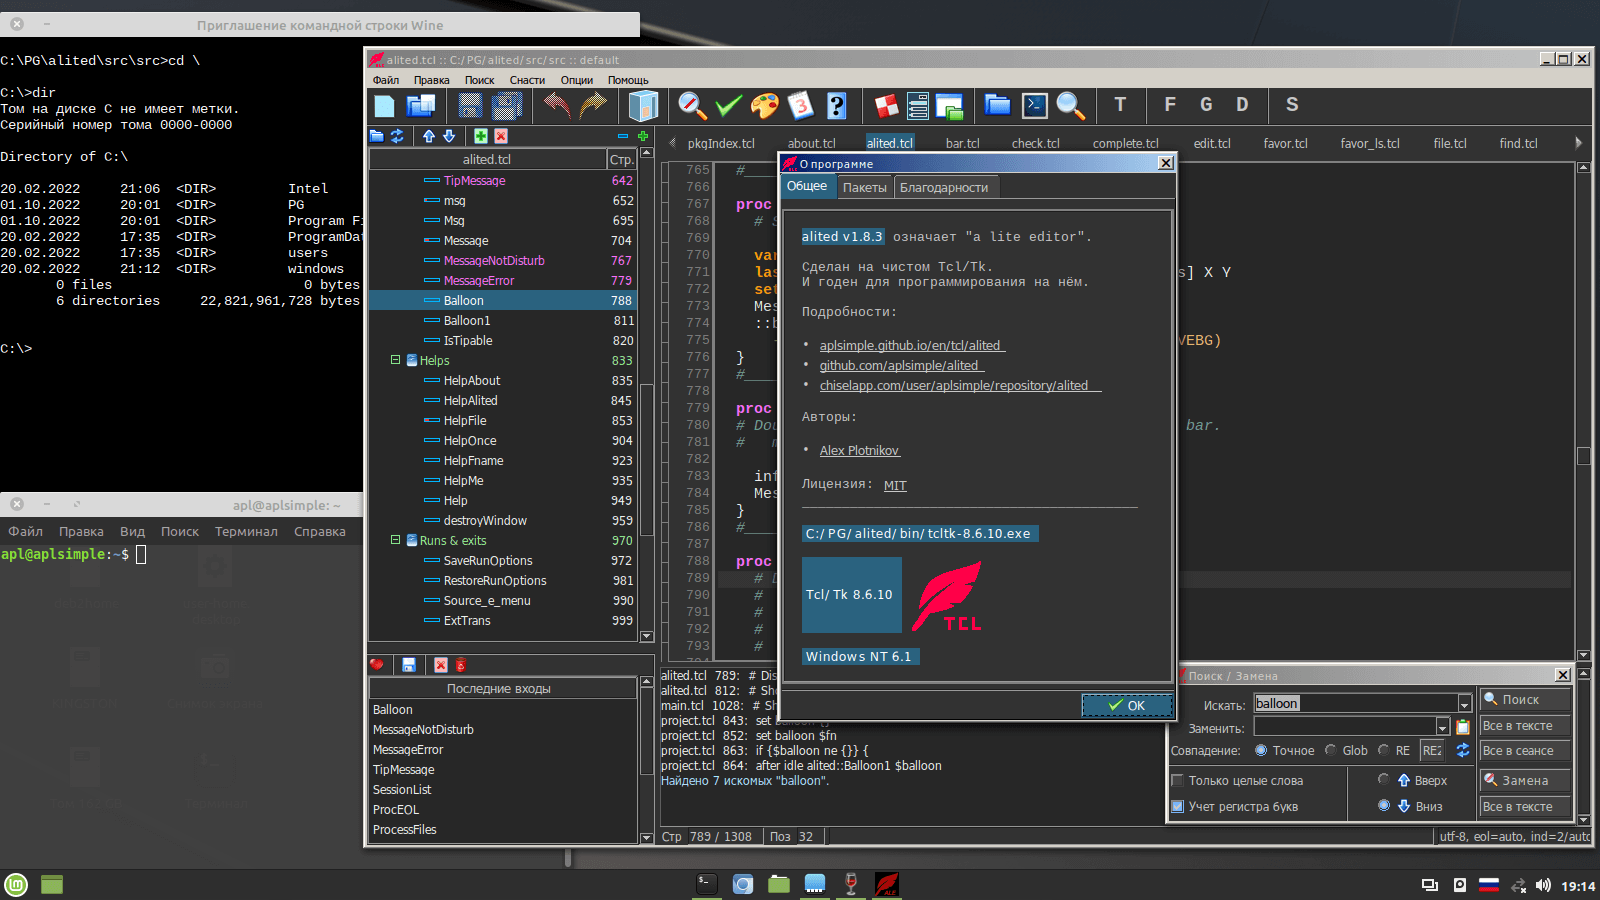
... and its localized variant running under Wine of Linux Mint DE on x86 machine (with Windows console started by alited, Linux console started by Linux Mint):
Installation
At installing and using alited, please, avoid directory paths with spaces. For example, MS Windows' usage like "C:\Program Files\alited" is no good, as well as a similar path to your deployed Tcl/Tk ("C:\Program Files\Tcl8.6").
The cause is that alited's tools may run external commands (e.g. the deployed Tcl/Tk) which is troublesome when the command names contain spaces.
If the requirement seems to you too brute, impertinent, silly etc., just throw alited in trash can.
1st way of installation
The simplest way of alited installation is using alited's installers.
The use of alited's installers is strictly recommended if you have deployed Tcl/Tk in a path with spaces, e.g. in "C:\Program Files\TclTk", for reasons mentioned above.
Also, if you have not (or want not) Tcl/Tk fully deployed on your machine, you use just one of alited's installers. Along with the installed alited you'll get also vanilla Tcl/Tk (in "bin" subdirectory of the installation directory).
You may prefer the use of alited's installers if you dislike the mess with alited's source and its possible dependencies.
2nd way of installation
When you have Tcl/Tk deployed on your machine and like to install and run alited from its source, you need only to unpack alited's source to a directory and run it with "tclsh src/alited.tcl" command. Thus, in this case the installation of alited is straightforward as well:
- unpack alited.zip to some directory, say ~/PG/alited
- to run the installed alited, use the command:
wish ~/PG/alited/src/alited.tcl
In Linux, you can run tclsh instead of wish.
Being written in pure Tcl/Tk, alited needs only the core Tcl/Tk packages.
If you are a novice to Tcl/Tk 8.6.10+, you might try to install it. Then install alited and its dependencies, noticing the messages of CLI at running alited. Let the installations be a sort of exercise in Tcl/Tk.
Still in MS Windows, it's enough to install BAWT or Magicsplat distribution.
In Linux, possibly you need to install the packages:
- tcl8.6
- tcllib
- tk8.6
- tklib
- tcl-tls
- tcl-vfs
- tclx8.4
That said, these packages are probably a minimum list to make Tcl/Tk viable.
Using tclkits
As noticed above, alited is born for development of Tcl/Tk projects, so it requires a basic Tcl/Tk knowledge and the installed Tcl/Tk packages.
No need for a stand-alone alited executable. Hence, two advantages: 1) alited can be a source of code snippets available in default project, for those who intends to use apave, e_menu, bartabs, baltip and hl_tcl packages; 2) alited's license allows using its code for a further customization.
Besides, a stand-alone alited would be unusable at all, because alited needs tclsh, wish or tclkit to run its tools.
If you use a stand-alone tclkit instead of fully installed Tcl/Tk, run alited with a command:
tclkit ~/PG/alited/src/alited.tcl
While alited works fine under tclkits based on Tcl/Tk 8.6.10+ (as it uses core Tcl/Tk packages only), you may develop programs requiring non-core packages. In such cases, these programs should append to auto_path the appropriate paths to the non-core packages. Preferably these paths should be subdirectories of your project, so that you make your project independent on the availability of packages at other machines.
Another way to have tclkits be friendly with the non-core packages is setting TCLLIBPATH environment variable before running alited:
# in Linux:
export TCLLIBPATH="~/myPrj/package1 ~/myPrj/package2"
# in MS Windows:
set TCLLIBPATH=~/myPrj/package1 ~/myPrj/package2
# run alited to edit/run/debug a script
tclkit alited.tcl myScript.tcl
# or a whole project:
tclkit alited.tcl ~/.config/myAlitedOptionsDir
... and when in alited we run a script, there are no errors at
package require package1; package require package2.
Note: in Linux, the best way is probably using ~/.profile file where you can set something like:
export TCLLIBPATH="~/myPrj/package1 ~/myPrj/package2 /usr/lib/treectrl2.4.1 /usr/lib/tcltk/x86_64-linux-gnu/Img1.4.13"
A lot of tclkit links are available in the wiki's Tclkit page.
Also, here are some direct links to download the stand-alone tclkits:
Like tclkit, vanilla Tcl/Tk is a stand-alone executable that can be used instead of fully deployed Tcl/Tk. Just run alited with a command:
vanillawish ~/PG/alited/src/alited.tcl
A lot of vanilla Tcl/Tk builds are available at androwish.org. Just select a vanilla wish corresponding to your platform.
Also, here are some direct links to download the vanillawishs:
The androwish vanilla builds contain a lot of additional Tcl/Tk packages which makes them so remarkable. Thus, you need not install most of the popular packages while using an androwish's vanilla wish.
Note:
In alited's "Preferences / Tools", you can set a specific version of tclsh / wish / tclkit as "tclsh, wish or tclkit" option. This way you can test your scripts by a specific version of Tcl/Tk (still it's desirable to be 8.6.10 or later).
First start
At the very first start, alited offers some simple initial actions.
Namely: you are offered to choose a configuration directory where alited will store its settings.
The default ~/.config is probably the best choice if you don't plan to have several types of projects at your machine.
On the other hand, if you choose some other configuration directory, this directory's name may be passed to alited as its first argument.
You can have several copies of your configuration directories, e.g. ~/.config/alited1, ~/.config/alited2 etc. each of them customized for its own type of projects: public/private, for work/fun and so on.
Thus, you can develop some fun projects with "Florid" color scheme and a funny font for editing. Or hobby projects with other settings. At last, work projects with "tough-stuff" settings:)
For example, I have two configuration directories of alited - one for a development version and one for a release version of alited. The latter is used for other projects, though it might be divided into several types, with their own links to start alited.
Using configurations
At the next starts of alited, you can use the following syntax (where, instead of tclsh, there may be any of Tcl/Tk executables: wish, tclkit, vanillawish):
1. For using a previous configuration directory:
tclsh alited.tcl
2. The same, with opening file(s):
tclsh alited.tcl file1.tcl ?file2.tcl ...?
3. For using a new configuration directory (it should exist!):
tclsh alited.tcl new-config-dir
4. The same, with opening file(s):
tclsh alited.tcl new-config-dir file1.tcl ?file2.tcl ...?
Also, you can switch configurations "on fly", choosing Setup / Configurations... menu item.
By default, Tools of alited are created per a configuration, in a separate subdirectory of menus handled by e_menu. With Preferences / Tools / e_menu setting you can redefine the directory of e_menu's menus, e.g. to have it common for all configurations.
Units
alited is unit oriented which is its main feature.
This means making a unit tree of Tcl code, with branches and leaves.
Unit tree
The branches of the unit tree are created with special comments. The leaves are Tcl procedures and methods.
For example:
#! /usr/bin/env tclsh
#
# It's just an example.

# ________________ Packages used _____________ #
package require Tk

# ________________ "example" _________________ #
#
# Some words about...

namespace eval example {

  ## ___________ example's variables _________ ##

  variable var1 "value 1"
  variable var2 "value 2"

  ## __________ example's procedures _________ ##
  #
  # Below are procedure doing so and so.

  # this proc prints one
  proc one {} {puts "one"}

  # this proc prints two
  proc two {} {puts "two"}

  ## _________________ "my" __________________ ##
  #
  # Some words about...

  namespace eval my {

  ### ___________ my's variables ___________ ###
  variable var1 "val1"

  ### ___________ my's procedures __________ ###


  proc myone {} {puts "my one"}
  proc mytwo {} {puts "my two"}

  # this proc prints "my three"
  proc mythree {} {puts "my three"}

  ## ______________ end of "my" ______________ ##
  }

# _____________ end of "example" _____________ #
}
# _____________________  EOF _________________ #
This example will produce the following unit tree:
ROOT
  |__ Lines 1-4
  |__ Packages used
  |__ "example"
  |     |__ example's variables
  |     |__ example's procedures
  |     |     |__ one
  |     |     |__ two
  |     |__ "my"
  |     |     |__ my's variables
  |     |     |__ my's procedures
  |     |           |__ myone
  |     |           |__ mytwo
  |     |           |__ mythree
  |     |__ end of "my"
  |__ end of "example"
  |__ EOF
This example is small and easy to observe. Its tree view doesn't differ greatly from the code view.
In a real life, a code isn't easily observed even with bird's eye view or with code folding.
And here alited comes to help.
Branches and leaves
The unit tree doesn't means anything like code folding or structured editing which refer to the Tcl structural commands like if, switch, foreach, proc and so on. alited unit tree results from the hierarchical comments only.
The unit tree includes the unit comments as the branches and the procedures / methods as the leaves.
The unit comments are customized, e.g. #=== NAME === may be used instead.
The first # characters define the unit tree's level: # means 1, ## means 2, ### means 3 etc. It isn't reasonable to customize and use # NAME # and ## NAME ## and ### NAME ### etc. for the unit tree's levels, because any comment beginning with # would be treated as a unit.
Still, if you want to use # alone (without adding _ = - + ~ * . : etc.), you can customize alited so that ## will mean 1st level, ### 2nd level, #### 3rd level etc., using a branch regexp like this:
^\s*#(#+)\s+([^_]+[^[:blank:]]*)thus allowing the tree comments as follows:
## Initialize GUI
  ...some code
  ### This widget group
  ... this code
  ### That widget group
  ... that code
alited recognizes the units by these comments and presents them as a tree.
By default, alited uses Python's way of doc-commenting functions/ methods/ procedures (leaf units in alited's terms) which means their doc comments are usual Tcl commands inserted in a unit's body.
The famous Ruff! Tcl package is oriented to this way of commenting.
If you prefer the doc commenting in "non-alited" way i.e. placing them above unit declarations, then you can easily customize alited so that it will see them and their units' bodies as the alited leaf units.
The appropriate settings are in Preferences / Units: just enable leaf's regexp
^\s*#\s*[=]+([^=]*)\s*[=]+$
which means that the following snippet will be myProc leaf in alited's unit tree:
# ======== myProc ========

# Does so and so.
#   a - 1st parameter
#   b - 2nd parameter

proc myProc {a b} {
  command1
  command2
  ..
}
Of course, the above leaf's regexp can be customized according to your own taste.
If you'll make these changes in the unit regexps, it will make sense to modify the according templates: 1 (2, 3) level, proc and method.
Creation of the tree
To insert a tree branch into your code, use the key combinations:
- Shift+F1 for 1st level
- Shift+F2 for 2nd level
- Shift+F3 for 3rd level
It seems the default three levels are quite enough. Still, you can add 4th, 5th... branches' levels, as well as change the default keys to use, in "Setup / Templates" menu item.
To add a procedure / method, use:
- Alt+P to add a procedure
- Alt+M to add a method
The unit tree has its own toolbar allowing to arrange the tree.
The Up / Down buttons allow to move unit(s) through the tree.
In fact, they are moved through a code, so that you can arrange your code without cut/copy/paste. Only moving units.
To move a group of units, select them with Ctrl+click. Then you can use "Move Up" and "Move Down" buttons to move the group up or down in the code.
Also, Shift key can be used to select a range of units, this way:
- click a first unit of the range
- press Shift and click a last unit
If the selected group should be moved to a far position, you can use "Drop Selected Unit Here" of the tree's context menu. Just right-click a tree item before you want to place the group and choose this action from the context menu.
Also, you can drag and drop a unit before a target position of the unit tree. There is no posibility to drag and drop a group of units.
Favorites and Last visited
When you navigate through the unit tree, the cursor positions are saved/restored in visited units. You can continue with units in the same positions you left them.
Note: this feature is active only in a current session of alited.
Any unit of any file of a project can be marked/unmarked as favorite. The "Favorites" list allows quick opening a favorite unit.
Each project has its own list of favorites.
If some favorites' list is valuable, you can save it by its own name to return to these favorites afterwards. For this, use "Saved Lists of Favorites" button of the toolbar or the appropriate item of menu.
This way you can keep a kind of "projects inside a project", choosing a list of favorites for appropriate tasks inside a current project.
Besides usual Add / Change / Delete buttons, the "Saved Lists of Favorites" dialogue provides the following facilities:
- Add Files tool button creates the favorite list from the current session's files
- Current list of favorites tool button fills the lower list of favorites
with the current list from the main alited's window.
After that, Change button can be used to update a current favorites item. - Select button or double-clicking a list item makes it active.
- Open... button just opens favorites' files and places them in the beginning of the tabbar. Very good for short tasks to open them at need.
- Back button returns to an original list of favorites that were active at opening the current project.
The "Last Visited" list is a comrade of the favorites. It allows fast accessing the last visited units.
The "Search / To Last Visited" menu item (Alt+Backspace) switches between last two visited units.
The "Last Visited" list is populated and changed when you:
- click a unit's content
- change a unit's content
- switch tabs of edited files
- choose the unit tree's item
- choose the infobar's item
- choose the Favorites/Last Visited's item
- press Alt+Backspace ("To Last Visited")
- press Alt+B ("To Matched Bracket")
- press Ctrl+L ("Look for Declaration")
- press F3 ("Find Next")
- press keys of a text's context menu (not hitting a menu item!)
- undo / redo changes
It seems only a simple navigation with Up / Down / PageUp / PageDown keys doesn't populate "Last Visited" list.
When you choose an item of "Favorites" or "Last Visited" list, alited tries to enter a unit even when its file isn't open yet.
Both "Favorites" and "Last Visited" lists (as well as their current visibility) are saved for all other sessions of alited.
Note: to ensure this saving feature, it's recommended to quit alited before shutdowning your machine or, in "Preferences / General / Saving", set all of "Save configuration" options to ON.
It would be convenient to have "Last Visited" open in most sessions of alited - and to open "Favorites" at need.
In a session, the visited units are highlighted in the unit tree, so that you can see which of them were visited. The more observed, the more navigated.
Unit descriptions
The unit descriptions ("docstrings") are the continuous lines of comments describing a unit as a whole.
By default, alited is set to see the unit descriptions inside the unit body, when the docstrings are located just under the appropriate declaration, e.g.:
proc ::K {x y} {

  # K combinator.
  #   x - returned value
  #   y - discarded value

  # it isn't a docstring comment
  set x
}
There is also another way of placing the unit descriptions: just above the appropriate declaration, e.g.:
# ==== ::K ====

# K combinator.
#   x - returned value
#   y - discarded value

proc ::K {x y} {

  # it isn't a docstring comment
  set x
}
The above ("outside") descriptions set a problem before alited's unit tree: when you select a unit in the unit tree, the cursor is set on its declaration, while you would prefer it being on the head line of its description.
The problem is solved by Leaf's regexp option of Projects/Options settings. Just refer to Projects/Options settings and switch the Use leaf's regexp on. Then you may customize the regular expression, by default it equals to
{^\s*#\s*=+\s*([^=\s]+)\s*=+$}
so e.g. the # ==== ::K ==== line will be seen as the unit's beginning line. (Don't forget clicking "Change" button to save the project options.)
Also, the alited allows converting the docstring format of Tcl scripts from one to other and vice versa. For this, the Setup / Move Units Description menu item is used.
The Move Units Description dialogue allows moving the unit descriptions inside or outside the leaf units (procs and methods).
Switch on the appropriate direction (to inside or outside). Then enter the Separator - a comment that will separate the units. It can be a combination of ### or === or --- or ___ that is preceding with Tcl comment character (#).
The N of Separator field is a wildcard for the unit name. The number in parenthesises (70) means maximum length of separators at converting.
You can convert a current file or "all files" i.e. all Tcl files that have been open and viewed in the current alited session.
Note #1: If all of your projects are using the "outside" unit descriptions, just refer to the Preferences / Units and customize Leaf's regexp which will be active for all projects (if not overcome by the project options).
Note #2: The inside unit descriptions allow using Ruff! doc generator. It's default setting of alited as well.
Searching units etc.
Two search tools might be very useful while you are dealing with the units:
- Search Units
- Go to Line
After pressing Ctrl+Shift+F you get "Search Units" bar where you can search units by their case insensitive glob patterns. Very useful.
After searching just click the info listbox's item to enter a found unit. With the listbox's context menu, you can also set "Don't focus a text" mode to scan the found units with keys.
Pressing Ctrl+G brings up "Go to Line" dialogue allowing you to go to a unit by a relative line number. It's useful when you get an error message with a proc / method name and a line number.
The alited provides a tool to check Tcl code for consistencies of brackets. In fact, it allows to find "problem" units. It's useful when you get a peculiar error message.
At checking Tcl code, please, pay attention to a whole content of a unit, i.e. all lines between its start and a next unit's. Some "errors" are natural and eliminated by "END of namespace" or similar branches. See the above example.
The unit tree and the file tree are switched to / from by appropriate buttons of the tree toolbar.
Projects
alited is a project oriented editor, not a general purpose one.
alited provides nearly all the necessary to develop Tcl/Tk projects without ever quitting it till a machine's shutdown.
The projects seen by alited are stored in ~/.config directory chosen at the very first start of alited.
You can pass a config directory's name as an argument to alited. This allows you to have various types of projects at one machine: public/private, for work/fun... configuring them properly.
"Projects" dialogue
The projects are listed in "Setup / Projects" menu item. Also, you can click "Projects" icon of the tool bar.
The default project refers to alited's installation directory, just for a start.
At creating a new project, you must fill the appropriate data fields - most importantly a project directory.
After filling the new project's fields you should press "Add" button to create it.
To open a project, just select it in the project list, then hit "Select" button.
Use Create a project by template button for templating projects.
This method is based on the template of directory / file tree, in Templates tab.
Use the text field to set the structure of directory, indenting it with equal indentations.
Note: There may be up to 16 templates, all their
names being collected in the combobox. A new template is saved only at using it.
Use Project directory button to view the project directory.
The Notes field may be used as a sort of diary for the project. Also, you can keep a list of TODOs in Notes.
The calendar and the text below are used to set deadlines of the TODOs. It's very useful, especially for projects developed unsteadily!
Notes and calendar fields are very good at maintaining projects. Actually, any idea that occurs to you, is welcome to this calendar helper.
To set a deadline:
- select a day in the calendar
- enter a text (reminder) of TODO
- use buttons to erase/paste/undo/redo the text
- use move buttons to postpone a TODO till next day or week
When the TODO is done, just erase it with Erase button.
To view all TODOs (expired, current and future), click the tool button named All pending TODOs. The open dialogue supplies the same actions with TODO as Projects dialogue.
Project options
There are few options for projects, seen in "Options" tab of "Projects" dialogue. Some of them are obvious, while others need commenting.
"Skip subdirectories" option mean that some subdirectories of the project root directory would be ignored. This matters especially for .git subdirectory, as it can contain a lot of files not needed by alited at all.
"End of line" option - if it is empty, the EOLs for saved files are defined by your platform. But if you have some projects with other EOLs, set the field accordingly.
"Indentation" is a number of spaces to indent your texts' lines. If "Auto detection" is on, a text indentation is defined by its first indented line while for a new file it's set by this option.
Note: This options sets also Tab character's length, if you mapped the default completion to an other key instead of Tab.
The "Unit lines per 1 red bar" option means that N lines of a unit are considered normal, while each N additional lines of the unit would add a red bar to its icon at the unit tree, up to 7th bar.
When the icon becomes fully (or mostly) red, this is like sending you "a bit too long unit" message, i.e. the unit probably needs a sort of reforming.
There are 8 grades of redness: 0, 1*N, 2*N, 3*N ... 7*N. So, if N=10, then 80 lines would mean "a too long unit". Just look at the unit tree to detect those horrible reds, candidates for reforming.
"Multiline strings" option means that Tcl strings can be continued in several lines without "\" and "\n", for example:
set multistr "It's
  a multiline
  string
  "
However convenient, this practice is not recommended for projects with "large" files, i.e. containing more than 2000 LOC. On these files, alited works rather slow with multiline strings.
Instead, you might switch this option off and use the following layout of strings:
set multistr "It's \
\n  a multiline \
\n  string \
\n  "
(or just avoid the multilines at all).
Note: the default options for the new projects are set in "General / Project" tab of "Preferences" dialogue.
Project templates
"Templates" tab of "Projects" dialogue allows to set a directory/file tree that will be used at creating a project with Create a project by template button.
The template is set in the text field, by these simple rules:
- the lines contain directory / file names; blank lines are ignored; special characters in the names (", /, \, ~, *, ? etc.) aren't allowed
- file names are the names that satisfy one of -nocase patterns:
- license*, licence* (e.g. License.md, LICENSE, licence.txt etc.)
- readme* (e.g. Readme.md, README, readme.txt etc.)
- changelog* (e.g. Changelog.md, CHANGELOG, changelog.txt etc.)
- if a license file is found in a current project, it will be copied to a templated project; other files will be created blank
- all of other names are directory names
- first non-empty line of the template sets an initial indent, the following lines must be indented at least by this indent
- first additional indent means an indent to set subdirectories; the following subdirectories must be equally indented by this indent
- the directories and files will be created under the project's root
Use Default button to set the default template of dir/file tree. This button shows also an example of project template.
Use Create a project by template button for templating projects.
Use Project directory button to view the result of templating.
A current template is saved in the Template combobox after running Create a project by template (up to 16 templates may be saved).
Project commands
In Projects dialogue, Commands tab allow you to set command(s) that would be applied to a current project.
Also, you can set general commands for all projects of the project list.
Any project can have its own commands as well as general commands for all projects.
These commands might be useful:
- to clear projects of trash
- to control projects' consistencies
- to check projects for SCM status
- to synchronize projects
These commands can be OS commands or executables. For example, the commands below are good for checking the Git status of all projects. Especially if colored with colordiff, the change lines will show what repos were changed):
rm log.txt
echo ----------------
pwd
git status
All commands are executed in an appropriate project directory, i.e. the above commands will be in fact:
cd a-project-root-dir
rm log.txt
echo ----------------
pwd
git status
Check the checkbuttons "Run it" to activate the commands.
Click "Run" button to execute the checked commands. The settings are saved after the click.
File tree
To open existing files of your project you can switch to the project file tree. For this, use "Switch to File Tree" button of tree toolbar.
With double-clicking a file, you open it. To open all Tcl files of a directory, use the tree's context menu.
The open files are highlighted in the file tree. When a file is closed it's unhighlighted.
A newly open file is placed in the very beginning of the tab bar. This is true even when you select a tab bar file that isn't among the visible tabs.
Press Ctrl+Tab keys to switch between last two edited files. "Last visited is most needed."
If your currently edited file doesn't belong to the current project directory, you can move this file to it. For this, use "Move File" buttons. The buttons allow to move files in the project subdirectories.
There are also "Create File/Directory" options of the file tree available through the tree's context menu.
Switching projects
When projects are switched, alited saves and restores:
- a list of open files
- cursor positions in the files
- a currently open file
- a list of favorites
- a list of favorites' lists
- a list of last visited units
If you want some files of the old project to remain open in the new project, select them in the tab bar by Ctrl+click, then switch to the new project.
Search
Along with the unit facilities, alited provides a lot of search tools to navigate throughout a project.
Search menu
The search facilities of alited are presented in Search menu:
- Find / Replace command (Ctrl+F keys)
when Ctrl+F pressed twice, performs a search in a last mode (once, in text, in all) - Find Next command (F3 key customized in "Setup / Preferences / Keys")
- Look for Declaration command (Ctrl+L keys customized in "Setup / Preferences / Keys")
- Look for Word command (Ctrl+Shift+L keys customized in "Setup / Preferences / Keys")
- Find Unit command (Ctrl+Shift+F keys)
when Ctrl+Shift+F pressed twice, performs a search - Find by List command
searches a list of words in a current text; very useful in some cases - To Last Visited command (Alt+Backspace keys)
switches between two last visited units - To Matched Bracket command (Alt+B keys)
when the cursor is on a bracket, goes to its match - Go to Line command (Ctrl+G keys customized in "Setup / Preferences / Keys")
Note: if Ctrl+F (or Ctrl+Shift+F) keys are pressed twice, a last performed search starts immediately. When you need to repeat a search in text/session with many words of a text, this feature will help a lot: just repeatedly set the cursor on the words and do it.
Also, for highlighting words / selected strings, use alited's context menu on a text or double-click on a word. If there are multiple highlighted instances, they are highlighted with reddish color, otherwise the only instance is highlighted as a usual selection. This feature is very useful for example when you need to see all uses of a variable in a procedure: double click the variable and you'll see all of its occurences. At that, mouse moves and clicks on the text don't remove the highlighting, only a keypressing does.
Find / Replace
One of search tools is the "Find / Replace" dialogue, called with:
- Ctrl+F keys
- "Edit / Find/Replace" in menu
- "Find / Replace" in toolbar
The "Find / Replace" dialogue contains two sections:
- Find
- Replace
- do it once
- do it in text
- do it in session or in selected files
alited has the find and replace functions united in this dialogue.
The dialogue provides standard options of such type. Probably, except for some of them.
The "Replace by blank" option means that you can replace the found strings by the blank string which means just deleting the found strings!
As the blank replacements are rarely required, the "Replace by blank" option allows to avoid mistakes. Use it accordingly.
Another uncommon option is a search in selected files. Sometimes very useful.
If you select tabs of the tab bar with Ctrl+click, the "Find / Replace" dialogue will offer "All in N" meaning selected files (including a current one).
Another non-standard option allows applying filters to the found strings. The dialogue of the filters is brought up with "RE2" button.
The dialogue contains two text fields to enter lines with regular expressions (RE2):
- Including RE2:
- If any of its RE will prove true, the found string will be in the search result.
- Excluding RE2:
- If any of its RE will prove true, the found string will not be in the search result.
For example, with the main RE as
(^|[^:]){7}\m\w+::
and excluding RE2 as
\s*proc\s+
\s*method\s+
(\[|\{|"|;)\s*\m\w+::
we can search the uses of non-absolute names of variables
(at least, excluding declarations and calls of commands)
which is good at moving from Tcl/Tk 8.6 to Tcl/Tk 9.0.
If a RE2 line consists of asterisks only (e.g. ***),
the rest are skipped at filtering. Just to save useful RE2.
If a RE2 line begins with asteriks and continues with other
characters, it's skipped at filtering (e.g. *\s*proc\s+).
To enable / disable RE2, click the appropriate checkbox.
All of the found in text / session / selected files instances are presented in the info listbox.
The info listbox allows to go to a found instance's line, with just clicking it. At that, the "Find / Replace" dialogue may or may not be closed.
The info listbox has a context menu allowing you to navigate through its items just with keys (Up / Down / Ctrl+Home / Ctrl+End).
While the "Find / Replace" dialogue is open, the found strings are highlighted. When you close the dialogue, the highlighting disappears.
The "Find / Replace" dialogue allows you to replace the found strings with a new one. At single replacements, first hit "Find", then "Replace" - next found strings will be presented one by one.
To copy "Find" entry to "Replace" entry, click the button "Paste" or press Ctrl+R keys.
To fill "Find" field of the "Find / Replace" dialogue quickly, select a text or set the caret on a word and
- press Ctrl+F
- click "Find / Replace" icon of the toolbar
Also, the "Find / Replace" dialogue contains the -geometry checkbox (between "Find" and "Replace" buttons) allowing to set a default geometry of the dialogue.
Check it, then set the desirable geometry, then restart (or just close) alited - this default geometry would be set every time at opening the dialogue.
This default geometry is independent on any geometry changes whenever needed (e.g. to view more of find/replace fields).
Other search tools
Search facilities of alited include also:
- Find a unit
- Find a declaration
- Find a word
- Find by list
- Find in a directory
- Completion of commands and variables
- Highlighting words and selections
Press Ctrl+Shift+F or hit "Edit / Find Unit" menu item to find unit(s) by case insensitive glob patterns.
It's very helpful when you remember a part of a unit's name, so just enter this part to find the unit.
To look for a proc/method declaration, you can try:
- Ctrl+click on its name
- press Ctrl+L, when the cursor is on its name
- hit "Edit / Look for Declaration" menu item
For a quick search of a word (or a selected text), there is a nice Ctrl+Shift+click applied to the word. It means a search throughout alited session and is very helpful in some cases.
Sometimes, a whole list of words should be sought in a file. There is an appropriate item in "Search" menu. The search result is displayed in a text widget, so that you can copy-paste it to a code. After closing the window of search results, you can switch to another file without closing the window of search options.
To find a word or a selection in a directory, hit the appropriate button of the toolbar. The search will be performed by "grep" command with options:
- recursively in a chosen directory
- case insensible
Other "grep" facilities are available in e_menu tool. Run it with F4 key and hit "Search all" item.
The double click on a word highlights all of its occurences (if red) or only one (if not red). E.g., this allows to view a variable's usage.
Also, the double click allows to prove that the clicked word is unique throughout the file, which greatly facilitates the introduction of new names, symbols, tags etc.
If you want to highlight a selection, run a context menu.
Command / variable completion
To complete a command / variable, press Tab key while the cursor is on initial characters of it - this will offer you to select from a list of commands / variables available in alited session's files. The completed word can be modified in its entry, Enter key will replace a text's word with a current selection of the list.
If Tab key is pressed at $ (or $: or $::), the completion list would include only the variables of current proc/method and (if $: or $::) Tcl global variables.
The Tab key to do the completion is customizeable (like many other keys) in "Setup / Preferences / Keys".
Though, probably there is no need to change its mapping in Preferences, even when you use the Tab key to indent lines. The alited will expand such keypressing with indenting spaces when the cursor is set at the left (empty) part of the line.
Also, inside the current line, when the cursor is set on non-word character, pressing Tab key will insert the Tab character (Ctrl+T combination does it as well).
The indentation's length is set in Projects/Options.
At the completion, the commands to choose are:
- not qualified for a current file
- qualified for others (if they are declared so)
The proposed commands are taken from the unit trees of all files of the current alited's session. Thus, if you use your own leaf's regexp of Preferences/Units, then all leaf units (procedures and methods) should be commented according to the leaf's regexp, e.g. this way:
# ======== myProc ========

# Does so and so.
#   a - 1st parameter
#   b - 2nd parameter

proc myProc {a b} {

  command1 $a
  command2 $b
  ..
}
The myProc of the # ======== myProc ======== line will be taken to the unit tree and as such used at the command completion.
Book-marks
The book-marks are especially useful to navigate over a document without much of structure. Though, sometimes even a well structured Tcl script may require book-marking.
The book-marks are set in the mark bar at left side of the text box's line numbers. There are 24 book-marks of different colors, from bright green to bright red.
To set a book-mark, click any of the mark bar cell with the mouse left button. After that, you can click the cell to go to the mark, i.e. to the book-marked text position.
The book-marks are active during the current session of alited. Still, even if you close a file, its book-marks remain active in the session.
To clear a book-mark, click it with the mouse right button. The right button clicking an empty mark cell will bring out the popup menu which allows you:
- to clear all book-marks
- to change the mark bar's width
Tools
The tools of alited are presented by its tool bar and menu. Thus, they are called "bar/menu" tools.
Some of tools are provided by alited staticly i.e. they cannot be removed:
- Run
- e_menu
- tkcon
- Check Tcl
- File List
- Color Picker
- Screen Loupe
- Tcl/Tk help (in "Help" menu)
Other tools are collected in "Tools / bar/menu" submenu. These are provided by e_menu application. All of them (even installed by default) can be removed or substituted with other tools.
Run tool
The Run tool tries to run an application chosen as default for the currently edited file. For Tcl files, it is tclsh.
But alited recognizes special comments like:
#RUNF: file.tcl args
#RUNF1: file.tcl args
#RUNF2: file.tcl args
...
which means running "tclsh file.tcl args". Use Alt+R hot keys to insert its template into a text.
#EXEC: command args
#EXEC1: command args
#EXEC2: command args
...
which means running "command args". Use Alt+E hot keys to insert its template into a text.
There may be many those comments, from #RUNF1: / #EXEC1: to #RUNF99: / #EXEC99:, but only first of them would be run. #RUNF1: or #RUNF2: or #EXEC9: - this isn't of big importance (a matter of taste, mainly).
So, it's possible to run any command at editing any file of an application. Or test a specific script in various modes while editing it.
If you want to run a script "as is" disregarding those #RUNF1: / #EXEC1:, just call e_menu tool and choose "Run me" item. Or press F4 key twice. For non-Tcl files, default run modes are in fact defined in menu.em ("main menu").
Run tool executes Tcl script either of two ways:
- running a file inside a console
- running a file inside Tkcon application
You might prefer to run applications inside Tkcon. In this case you get a profit of introspecting your code in Tkcon.
This is customized in "Tools / Run..." menu item. See also "Setup / Preferences / Tools".On MS Windows, if you have a fully deployed Tcl/Tk 8.6.10+, the default path to its tclsh.exe is highly recommended. And, on the contrary, wish.exe and tclkit.exe aren't recommended. To install Tcl/Tk 8.6.10+ on MS Windows, use BAWT or Magicsplat distribution.
Anyhow, the path to Tcl executable should not contain spaces, otherwise alited's Run tool becomes unusable!
"Setup / Templates" dialogue allows to insert debugging messages in a code (with tk_messageBox or puts).
"Tools / Run..." menu item
In this dialogue, a current Tcl script (file.tcl) can be run in console or Tkcon. Both modes have their pros and contras - mostly pros, if properly used.
There is also as is mode that runs a command "as is", i.e. as it is entered in the command entry field.
With "By #RUNF: / #EXEC:" you write comments in a current file, like:
#RUNF: afile.tcl arg1 arg2 arg3or
#EXEC: tclsh afile.tcl arg1 arg2 arg3or even
#EXEC: xfce4-terminal --show-toolbar --hide-menubar -x tclsh afile.tcl arg1 arg2 arg3meaning that "tclsh afile.tcl arg1 arg2 arg3" will be run at editing the current file. If there is no #RUNF: nor #EXEC: comment, the current file is run by an associated application.
With "By command" you can set a list of arbitrary commands to be selected and run independently on a type of current file. It can be OS commands or executables to be run in console.
If a Tcl file has to be run, you can set the command with or without tclsh, wish, tclkit etc., for example:
/usr/bin/tclsh /home/me/myPG/src/file.tcl LOG=~/TMP/log.txt
/home/me/myPG/src/file.tcl LOG=~/TMP/log.txt
If your Tcl executable command includes spaces (not pretty nice case though), quote it. For example:
"C:\Tcl 64\bin\wish.exe" myproj3.tcl arg1 arg2...
The combobox's commands can be created and edited in the text box, at that the text's current line is highlighted and displayed in the combobox.
The commands and #RUNF: / #EXEC: comments can include wildcards:
- %f - current file's name
- %d - current file's directory
- %pd - project's directory
- %s - text's selection / current word
- %H - home directory
- %% - %
These two ways of "Run" are useful for two different type of projects:
- heterogeneous: a project contains a lot of files that need to be tested and debugged with their own commands - then #RUNF: / #EXEC: will help
- monolith: you have a lot of files that need a list of commands to test and debug the whole application (alited is an example)
Anyhow, "Run me" item of e_menu tool allows running a current file in "normal" manner by an associated application. Press F4 twice for it.
Also, you can enter commands to be run before running a current file.
It can be necessary for a specific project, sort of initialization.
These commands can be OS commands or executables, for example:
cd ~/TMP
rm log.txt
Run button runs a selected command. Sort of "run it on fly". The command is active all the time when "Run" dialogue is open. It's also run with F5 key.
The dialogue isn't closed with Run button, so that you can customize commands before saving them. Also, while "Run" dialogue is open, you can modify your scripts (the dialogue is non-modal).
After customizing all commands, press Save button: it saves the dialogue's current settings and closes it.
Cancel button dismisses all changes made in the dialogue.
All of the "Run" settings are per project.
Tcl/Tk help tool
In fact, Tcl/Tk help tool is provided by e_menu application. Namely:
- "Tcl/Tk help" is one of e_menu's ornamental items (HELP)
The Tcl/Tk help tool shows Tcl/Tk man page for a word the cursor is on (or for a selected text). Use F1 key to get the man page.
Still, this context help is available only if Tcl/Tk help pages are downloaded and copied to ~/DOC/www.tcl.tk/man/tcl8.6 (or similar) directory
... or when Internet is accessible. In such case, e_menu tries to get a help page from https://www.tcl.tk/man/tcl8.6/ which might be not what you want.
You can download Tcl/Tk 8.6.11 help by using the direct link:
Also, to download the last version of Tcl/Tk 8.6 help, you can use:
wget -r -k -l 2 -p --accept-regex=.+/man/tcl8\.6.+ https://www.tcl.tk/man/tcl8.6For Tcl/Tk 8.7 help, you can use:
wget -r -k -l 2 -p --accept-regex=.+/man/tcl8\.7.+ https://www.tcl.tk/man/tcl8.7Tcl/Tk context help in alited will be enabled by setting a path to the downloaded man pages in "Preferences / Tools / Path to man/tcl" field.
Check Tcl tool
alited provides a tool to check Tcl code for some consistencies. The tool is available in "Tools" menu and in the tool bar.
Every proc/method is checked for consistencies of braces, brackets and quotes as well as for duplicate unit names.
It's very useful at getting an obscure Tcl error.
This tool checks Tcl files (.tcl, .tm, .msg) for consistency of {}, [], () and "". Results are shown in the info bar.
Also, the files are checked for duplicate unit names.
The results contain general info about a file and specific data on its leaves (procedures and methods).
The branches are not checked.
Also the files as a whole are checked. There might be inconsistencies in some specific leaves and seemingly good results for the file as whole. And vice versa.
The file results include e0 (e1/e2/e3/e4) data meaning inconsistencies found for duplicate units of file and {}, [], (), "" of units accordingly.
The clicking on a result line of the info bar will open its appropriate unit.
An inconsistency for {} may occur if a procedure is located at edges of a namespace or a class - in such cases the unit may include its finishing braces. Another case of inconsistency is when some procedure declares a procedure inside itself.
To get rid of these "inconsistencies" you can insert branches named like "End of class/NS so and so". Or use a trick with semicolon before proc command to hide it in the unit tree, this way:
# ________________________ NS fooNS _________________________ #
namespace eval fooNS {
  ## ________________________ Procedures _________________________ ##
  proc foo {} {
      some_command
      # a proc inside another proc: good to mark and skip in the unit tree, as well as to search these types
    ; proc foo2 {} {
          some_command2
      }
  }
# ________________________ EONS fooNS _________________________ #
}
There may be inconsistencies of "", when the double quotes are used in regular expressions. Also, some procedures or methods may be rather voluminous (though mostly uniform, like a creation of menu items), so that they are divided into components with alited's branches. As a result, their units become "inconsistent" from alited's viewpoint.
To overcome these false inconsistencies, you can use special comments meaning "this unit is checked and proved normal", setting in comments alited and check (or check and alited) all case insensitive:
# alited checkor this way:
command to be checked... ;# CHECKED BY ALITED
Note: At opening "Check Tcl" dialogue, the checking for consistencies is executed for a current file automatically! Also, the checking for consistencies is executed for a current proc / method before "Tools / Run" automatically! If found, errors are reported about in the status bar, with a bell.
It's very good to eliminate all inconsistencies in a project - this would greatly help with eliminating the errors and omissions, however trifling they seem to be.
Project printer
The Project printer tool allows creating a "hard copy" of the project.
The hard copy is a set of .html files that are created from selected project files in the chosen output directory.
The markdown processor is used to include Readme, README, Readme.md, README.md (and so on) files into the .html files.
It's highly recommended to install and use the pandoc application available at github.com/jgm/pandoc/releases.
The alited's own markdown processor can be used for the very basic markdown documents like alited's README.md which is nevertheless quite sufficient for most of projects.
If you enter other markdown command, use in it %i wildcard for the source README and %o for a target (temporary) file.
The colors, sort units and width of contents affect the appearance of the resulting .html files. Sorting units is useful for unit trees without branches.
The file tree serves to select files for the resulting hard copy, using the tool bar above the tree or Space key.
The hard copy can be printed by means of a browser. Or be handled by a file manager or another final processor.
The final processor means a command to process the resulting hard copy, e.g. to embed it in a reference guide or just to browse the output directory. Use %D wildcard for its name. Alone %D or "%D" means opening index.html in a browser. Alone %e means opening index.html in alited.
Other wildcards for the final processor:
%H- home directory%P- directory of current project%F- current file name%A- directory of alited%M- directory of e_menu's menus%E- Tcl/Tk executable as set in Preferences/Tools (or one executing alited)%%- %
E.g.
%E %A/lib/e_menu/e_menu.tcl m=%M/misc ex=7runs 7th e_menu item of misc.em menu. In fact, it embeds the created hard copy into https://aplsimple.github.io.
The final processor can be run separately, with its tool button.
In the .html files, first included is a README file of the appropriate directory, if there is any of Readme, README, Readme.md, README.md (and so on).
Paver
The paver is a convenient tool for developing GUI with apave package alited is based upon.
It allows you to view and possibly change "on fly" a widget list passed as an argument to paveWindow method.
For this, place the cursor on some line inside a widget list and run paver so that you "visualize" the list to see how it will be shown in a real app.
If paver cannot recognize your widget list's beginning with paveWindow call, you can set # paver... comment before it, for example:
   # paver
   set widlist {
     {h_ - - 1 5}
     {lab T + 1 1 {-st e -pady 5} {-t Run:}}
     ...
   }
   # PAVER end
The same # paver comment may (though need not to) be placed behind the list's last line.
The # paver comments are case insensitive and may be added with any info, as shown above with # PAVER end.
The Auto Update menu item allows updating a tested widget list every time when its file is saved.
The Widget List menu item allows viewing and possibly changing the tested widget list "on fly", without touching a currently edited script.
The paver eliminates all references to variables and commands used in a widget list, thus leaving only a layout of GUI to show. So, if a widget list needs some variables/commands to make it working, paver would fail.
For example, the following widget list is not visualized by paver:
   set widgetlist {
     {fra + T 1 1 {-st nsew -cw 1 -rw 1}}
     {fra.ScfRuns - - 1 1  {pack -fill both -expand 1}}
     {tcl {
         set prt "- -"
         for {set i 0} {$i<$::maxCom} {incr i} {
           set lwid ".btT$i $prt 1 1 {} {-com {::mycom $i} -image myimg$i}"
           %C $lwid
           set prt ".btT$i T"
         }
       }
     }
   }
This widget list has tcl code to make a list of buttons depending on their maximum number.
On paver eliminating variables, this widget list isn't visualized by it. However, these layouts are rather rare and tricky, using most dark sides of apave package. They should be in fact tested in a real application. In alited's code there are only one or two of the "not pavered" lists among tens of them.
See demo of paver usage in alited's demo .
See also Description of apave package.
Customizing tools
Some tools, though default, can be replaced or removed. These tools are listed in "Tools / bar/menu" submenu and are customized in "Setup / Preferences / Tools".
These settings are also available through a popup menu called by right click on the toolbar.
In this dialogue, we can:
- add new actions and separators
- change actions or their icons
- remove actions and separators
New items are added by [+] button. Or you can use empty rows at the bottom.
Items are removed by [x] button.
Empty items are ignored. The list of items is scrollable.
To choose a tool, click its button at the right. Any non-menu items can be chosen directly while navigating through menus. If you want to choose a whole submenu, right click on this submenu and choose "Select" from a popup menu. Note: the main menu is run by e_menu tool.
To change a tool's icon, click its drop-down list. There are available icon-pictures and icon-characters. Highly likely, there is an icon expressing the tool's action.
As alited's tools are mostly provided by e_menu, you may find the following links useful:
Templates
The templates are available through "Setup / Templates" menu item and "Add Unit" button of the tree toolbar.
The "Templates" dialogue contain a list of templates, a current template's text and buttons to add / change / delete templates.
In the template text, use the following wildcards:
%d- date%t- time%u- user's login as set in "Preferences"%U- user's name as set in "Preferences"%m- user's mail as set in "Preferences"%w- user's web site as set in "Preferences"%F- current file's name%f- current file's tail name%n- current file's root name (namespace)%p- current procedure/method's name%a- current procedure/method's arguments%A- directory of alited%M- directory of menus used by e_menu
After entering a template's text, set the cursor where it should be at inserting. Then save it with "Add" or "Change" button.
The "Import" button allows to fetch new templates from an external alited.ini, for example from the default alited's.
A few of templates support alited's unit tree:
- proc and method - to insert a proc/method declaration
- underline proc/method - to underline a proc/method (and anything else)
- args - to insert comments of proc/method arguments
- 1/2/3 level - to insert a branch of 1/2/3 level
- header - to insert a script header
- namespace - to insert a namespace declaration
There are templates to introspect variables, to enter a Tcl command, to profile Tcl code. See their description in Debugging and testing below.
Docking Framework
The idea of this tool originates from the brilliant Docking framework, thanks to its author Flame. This masterpiece has been modified a little to fit alited's requirements.
With this tool you can:
- make GUI with 10 panes, using drag-and-drops
- populate the panes with ttk::notebook tabs
- save the layout to use it
- with Docking framework
- with apave package
The Tools / Paned GUI / Docking Framework menu item starts the tool for making the paned GUI. You can drag the tabs by their titles and drop them at all sides of other tabs and the whole window. Also, when you drop a tab at another tab's center, it becomes its neighbor tab inside the notebook.
The Tools / Paned GUI / DFW Layout menu item opens a layout saved with Tools / Docking Framework tool, to use it with the framework.
The Tools / Paned GUI / apave Layout menu item opens a layout saved with Tools / Docking Framework tool, to use it with the apave package.
The Tools / Paned GUI / Setup menu item allows to customize the output of the framework.
Note: Docking FW demo demonstrates how to use this tool to create the paned GUI.
Debugging and testing
Though alited doesn't provides classical tools for debugging, Tcl's facilities make the debugging easy and flexible.
Debugging
Most useful debugging tools of alited are provided by its templates message and puts, available through F7 and F8 keys.
The message template inserts tk_messageBox call into a current Tcl script, like this:
tk_messageBox -message "tool::DatePicker " ;#! TODELwhere the current proc/method's name is present (here
tool::DatePicker). The inline comment ";#! TODEL" marks the line as TODO to be deleted. All of such comments are easily found through the specific TODEL mark.
The debugging message can include any useful information (variables, command calls, global counts etc.). This message template is like classical Stop debugging tool.
The puts template inserts puts call into a current Tcl script, like this:
puts "[incr ::-ALE-] tool::DatePicker " ;#! TODELwhere the above described components are present, plus a specific
[incr ::-ALE-] count. The puts will put the message into stdout, so that we can see what's happening in this point of the script.
Other templates allow to view local and global variables, these are:
- INFO LOCALS
- INFO GLOBALS
- INFO VARS [NAMESPACE CURRENT]
The COMMAND template allows to suspend the script's execution in order to enter and execute a Tcl command. It's useful when some piece of code needs a run-time checking & correcting, without changing the original code.
There can happen intricacies, when your application is hanged up deadly and you don't know where to dig the bug and what's that at all.
In such cases, try the following:
- open the script which (most obviously) hangs up your application
- run T tool or its menu item Tools / bar-menu / tests.em: Tests
- run the item "Trace file.tcl" which will insert the tracing "puts" into the current "file.tcl"
- launch the "file.tcl" and notice in the terminal what is the last proc/method's "puts"
- it's the last traced proc/method that is responsible for the hanging your app; debug it
- before or after the debugging, run "Untrace file.tcl" item of T tool to remove the tracing "puts"
Testing
The doctest template allows to use doctest facilities available in T tool of alited (or its menu item Tools / bar-menu / tests.em: Tests).
Briefly, the doctest means specific comments used to test a script's algorithms.
The doctest is described at aplsimple.github.io/en/tcl/doctest. The help is also present among T tool's items.
Using Tkcon
alited allows to run Tcl scripts from Tkcon, so that you can access the internal machinery of a script, with entering Tcl commands in Tkcon while the script is executed.
The Tools / Run... tool has Tkcon checkbox that allows to do this.
However, even a "bare" Tkcon (e.g. run from alited's Tools) provides the great facilities to debug and test Tcl applications. Try this:
- run Tkcon
- open its menu item Console / Attach To... / Interpreter / "your Tcl app"
- enter any debugging commands, for example:
namespace childreninfo varsinfo vars NS::*set NS::somevariable
- at entering commands in Tkcon, use Tab key to autocomplete variables and commands
- to cancel the attaching to Tcl app, use Console / Attach To... / Interpreter / None
Profiling
Three templates allow to use a bit modified profilers of Tcl/Tk wiki.
- profiler template uses
::PR start ?command ...?::PR end
to start and stop the profiling. List the exact command names after::PR start. - ep_profiler template uses
::PR start ?pattern ...?::PR end
to start and stop the profiling. List the glob patterns of command names after::PR start. - cp_profiler template allows to set a checkpoints (any unique ID) where the profiler would collect the profiling data:
::PR start...::PR start cp1...::PR start cp2...::PR end
to profile Tcl snippets. The results would refer to the code snippets between "start", "cp1", "cp2"... points.
::PR start" line to another point below.
And don't forget to remove the profiler's lines after the profiling done! They are marked with ;# TODEL comments.
Editing
There are several sources of editing features provided by alited.
Context menu
With right-clicking a text, you get a context menu containing:
- Cut / Copy / Paste commands
- Undo / Redo commands
- Line processing commands:
- Double Selection (Ctrl+D keys customized in "Setup / Preferences / Keys")
if there is no selected text, a current line is duplicated - Delete Line (Ctrl+Y keys customized in "Setup / Preferences / Keys")
- Line(s) Up (Alt+Up keys)
if several lines are selected, all of them are moved up - Line(s) Down (Alt+Down keys)
if several lines are selected, all of them are moved down
- Double Selection (Ctrl+D keys customized in "Setup / Preferences / Keys")
- Highlight processing commands:
- Highlight First (Alt+Q keys customized in "Setup / Preferences / Keys")
- Highlight Last (Alt+W keys customized in "Setup / Preferences / Keys")
- Highlight Previous (Alt+Left keys)
- Highlight Next (Alt+Right keys)
- Highlight All (double click on a word)
if there is a selected text, this menu item highlight all its instances
- Highlight First (Alt+Q keys customized in "Setup / Preferences / Keys")
- Select All (Ctrl+A keys)
Edit menu
The menu bar of alited provides Edit menu containing:
- Indent command (Ctrl+I keys customized in "Setup / Preferences / Keys")
- Unindent command (Ctrl+U keys customized in "Setup / Preferences / Keys")
- Correct Indentation
applied to a Tcl file (a whole of it) - Comment command (Ctrl+[ keys customized in "Setup / Preferences / Keys")
- Uncomment command (Ctrl+] keys customized in "Setup / Preferences / Keys")
- Put New Line command (Ctrl+P keys customized in "Setup / Preferences / Keys")
Note 1:
Comment and Uncomment commands use escaping/unescaping braces with #\{ #\} patterns. Thus, you can safely comment/uncomment any code blocks, this way:
set num 2
if { $num == 1 } {
  puts 1
#!#\} elseif #\{ $num == 2 #\} #\{
#!  puts 2
} else {
  puts 99
}
instead of this mistaken out-commenting as noted in
comp.lang.tcl:
set num 2
if { $num == 1 } {
  puts 1
#} elseif { $num == 2 } {
#  puts 2
} else {
  puts 99
}
where elseif { $num == 2 } is still active.
Note 2: If you comment a code with menu "Edit/Comment" or keys Ctrl+[, you should uncomment it with "Edit/Uncomment" or Ctrl+], to uncomment braces as well.
Note 3: Anyhow, avoid using non-escaped unmatched braces in a command.
Escape braces, as in the following snippet:
proc foo {} {
  puts \{
  foreach c [split qwerty {}] {
    puts -nonewline $c-
  }
  puts \n\}    ;# also fit: puts "\n\}"
}
foo
instead of:
# BAD STYLE: there will be Tcl error after
# removing either of bracing "puts" or removing/escaping its brace
proc foo {} {
  puts "{"
  foreach c [split qwerty {}] {puts -nonewline $c-}
  puts "\n}"
}
foo
Rectangular selection
The "Rectangular Selection" submenu allows you:
- to select a rectangle of text
- to cut the selected rectangle
- to copy the selected rectangle
- to paste the cut/copied rectangle
First, you select a rectangle: place the cursor to a first position, choose "Rectangular selection / Start" and move the cursor to a second position. At that, "Rectangular selection / Start" menu item becomes checked.
Then, the selected rectangle can be cut or copied, with choosing "Rectangular selection / Cut (Copy)". At that, the "Rectangular selection / Start" menu item becomes unchecked.
At last, place the cursor to a position to paste and choose "Rectangular selection / Paste". The cut (copied) rectangle will be inserted in the text at this cursor position.
Keys setup
A few of keys are customized with "Setup / Preferences / Keys" menu item.
To select a key that is already mapped to some action, the usual programming practice is used to exchange things, e.g. variables "a" and "b" (temp=b; b=a; a=temp).
For example, you need the key mappings:
- Complete Commands - F11 (by default, Tab)
- Double Selection - Control-Y (by default, Control-D)
- Delete Line - Control-D (by default, Control-Y)
You act this way:
- map RESERVED action (F11 by default) to a free key, say, Control-0
- map Complete Commands action to F11
- map Double Selection action to Tab
- map Delete Line action to Control-D
- map Double Selection action to Control-Y
This way, you will use Tab key to indent.
Note: Some key combinations can be not accessible due to their use by OS.
In Linux, for example, Ctrl+F5 may be used to switch to 5th desktop, so that if you don't have the 5th desktop and want Ctrl+F5 be used in alited, just clear this OS setting.
Miscellaneous keys
alited sees also some hotkeys that aren't presented in menus. These are:
- Ctrl+Tab switches between last two edited files
- Ctrl+Enter (Shift+Enter) adds a new line without indentation
- Ctrl+Up moves the cursor to a previous paragraph
- Ctrl+Down moves the cursor to a next paragraph
- Ctrl+B moves the cursor to the real beginning of wrapped line
- Ctrl+E moves the cursor to the real end of wrapped line
- Ctrl+K clears a line's right part
- Ctrl+T inserts a Tab character (its length is set by "Projects / Options / Indentation")
- Ctrl+Shift+U allows to enter Unicode character, by its number (after entering it press Enter key)
Note: By default, Tab key is used in alited for "Command complete" tool. Refer to "Preferences/Keys" to redefine it.
alited promotes the idea of Tabs Are Evil. A typical case: you use 4-space Tabs and get an external code using 8-space Tabs and (unintentionally) Spaces to indent the code - then you get a mess of indentation as well.
Formatting
The Edit / Formats menu provides a batch of useful text handlers that apply various formatting methods to the current text.
Mostly, the handlers deal with the selected text. The selection can be only one, multiple selections are not allowed.
If there is no text selection, the current line is processed.
The handlers can be modified or added. For this, choose Edit / Formats / Open... menu item, then select a file of appropriate type. If you create ("save as") a new handler, restart alited to make it active.
The existing handlers are commented in every detail. When creating a new handler, name it so that its initial 4 characters allow placing it in the appropriate place among its comrade handlers. "Empty" names like 010, 100, 500 mean the dividers in Edit / Formats menus.
The Edit / Formats / External submenu contains not the text handlers but the external commands that process the current text selection or the lines of the selection. The externals are also commented in the smallest detail.
If a directory of formatters contains init.tcl file, it is sourced for all formatters of the directory. See, for example, Translation formatters.
The init.tcl file can include:
- default values of variables
- common procs
- initializing code
Note #1: if you decide to create a subdirectory of format directory, don't use spaces in its name. Use "_" or "-" instead.
Note #2: the Edit / Formats submenus are good candidates to "freeze" them with their dotted items and move them to convenient places of the screen, perhaps changing their sizes. So that they will be at hand in the next sessions of alited. An example of this is presented in "Little things" demo.
Pluginables
The Edit / Formats menu includes also Pluginable submenu. Its formatters are run by events (keyboard pressings).
The pluginables have the following structure:
mode = 6
sep = 1
icon = icon name
events = <event> ?<event>?
command =
# below is Tcl code of formatter
# ...
The mode=6 line sets the formatter's mode ("pluginable").
The sep= line is optional, it sets the separator in the tool bar.
The icon= line is optional, it sets the icon in the tool bar. The icon names are the same as in Preferences/Tools/bar-menu.
The events=... line sets a list of events which will trigger the formatter.
The events are separated with commas and/or spaces. At that, if present, 1st event's letter is recommended to be in upper case which is only used at getting accelerators and engaged keys, e.g.:
events = <Control-Q>, <Control-q>
The events must not overlap the alited's key mappings (as set in Preferences/Keys and Templates).
After events=... line, there follows command= line meaning that
the rest of file is treated as Tcl code block.
The Tcl code block can include wildcards:
%Wfor current text's path%ffor current edited file name%vfor selected text (or current line)
The commands may include calls to alited procedures, mostly of alited::
namespace. Details are in Reference.
This is the regular usage of mode=6, so the pluginables have normally
.tcl extension.
If not empty, the result of last command is inserted at the current text position or replaces selected text.
The call of a pluginable from Edit / Formats menu will register its hot key bindings, so that it can be run with pressing the hot keys. If you change the hot keys, just rerun the pluginable from Edit / Formats menu.
Note: the pluginable formatters and bar-menu tools are somewhat alike, but unlike e_menu's items the pluginables can employ the internals of alited:
- text buffers (the current is available through %W wildcard)
- alited's procs (documented in Reference)
Language translation
alited is a multilingual program and as such it provides a translation facility (for example, to add new .msg files to alited/data/msgs of alited's source :)
The translation is provided by Edit/Formats/Translation menu which can be customized and added (with Edit/Formats/Open...).
You need an access to Internet to translate the files.
To translate a text, select it and choose its appropriate translator, e.g. De-En translates from Deutsch to English.
Though, there is a limit of translation length. On September 2023 it is 1000 characters. The current line's length is seen in the "Col:" field of alited's status bar. If a line is too long, split it with Enter key and translate its parts.
The slowness of the translation is a cost of its "freedomness". After acquiring API key of LibreTranslate, you'll get the quick translation as well.
The translation options can be customized in data/format/Translation/init.tcl.
See details at:
Macros
The macros are available in "Edit / Play Macro" submenu.
To create a temporary macro, choose "Edit / Play Macro / Quick macro" menu item, then press a key sequence, finishing it with F12 key. This allows recording a macro just to "run and forget". Another run of this menu item will rewrite a previous quick macro.
The recorded macro is available through F12 key immediately after its recording done.
To create a saved macro, choose any saved macro, change its name to a new one and press "Record Macro" button. At recording, try to abide by the rules:
- don't use keys mapped in "Preferences / Keys" (anyhow, they aren't available in macros)
- preferable are usual "typewriter" keys like these:
- characters
- arrows, Home, End, PgUp, PgDown
- Ctrl+C, Ctrl+V, Ctrl+X, Ctrl+Arrow, Ctrl+K, Ctrl+B, Ctrl+E
- Shift+Home, Shift+End, Shift+Arrow
- Delete, BackSpace
- to use the mouse actions (moving, clicking), check "Record mouse" on
The saved macros can be played, recorded, deleted. All actions are available at choosing a saved macro from Play macro menu, with the appropriate tool buttons.
To record the new macro, choose any macro from "Edit / Play Macro" menu (except "Quick macro") and enter a new name of macro. Check Record mouse to record the mouse actions along with the keys.
After clicking Record Macro button for an existing macro, you can:
- rewrite it (pressing a new sequence of keys, ended with F12)
- edit it (open the macro's file in alited)
The "Comment" field is useful to remind how the macro should be used. The comment is updated after recording a new or rewriting an existing macro. The playing doesn't update the comment. In a macro file, the comment lines are marked with "#". Any macro file can be edited with "Edit / Play Macro / Open..." menu item.
If a macro is active, it's run with F12 hot key. Though the macros' maximum number is 97, only one macro may be active.
Any macro can be edited (and saved by a new name), even "Quick macro" if it's worth it. For this, choose "Edit / Play Macro / Open..." menu item.
If you need to use several macros one after another, fix "Edit / Play Macro" menu by its "-----" item which makes the menu tear-off.
Detach
Sometimes you need to view several texts on the screen. Say, to copy / paste code snippets from a Tcl example.
Of course, opening a file in another editor might be helpful at that, still alited provides viewing / editing several files simultaneously.
The Detach feature is used for this. It is available in
- File menu
- context menu of tab bar
- context menu of file tree
- context menu of Project / Files tab
In File menu, you can detach a currenly edited file or choose file(s) from the file picker. To choose several files, use Ctrl+click combination. Also, in File menu, you can switch the font size of detached editors.
In the context menu of tab bar, you can right-click a file's tab and detach it. Or select several files using Ctrl+click combination and then detach them.
The same method works also with file tree and Project / Files tab.
A detached file is used mostly for viewing and copying its selected snippets. At need you can edit it, still without any alited's functionality (of Edit, Search, Tools menus).
Note: first 8 simultaneously detached editors' geometries are saved by alited, so that you can resize and place them as you like it, to open files with their saved sizes and positions in future.
User syntax
If some project employs text data files of a simple "per line" structure, it would be convenient to view / edit them with alited, providing a "hl_ext.tcl" file to highlight their content.
alited's lib/addon directory contains scripts for highlighting files of appropriate extensions (e.g. hl_md.tcl for .md files).
As the simplest example of those highlighters, lib/addon/hl_alm.tcl can be taken, it is for editing alited's macros (menu "Edit / Play Macro", then "Record" button and "Edit").
The highlighter consists of two procedures:
- init - initializes the highlighting and provides a procedure's name for "line by line" highlighting; it gets parameters:
- w - the current text's path
- font - the current text's font
- szfont - the current font size
- args - the list of highlighting colors used in alited's current color scheme
- w - the current text's path
- il - the current line's number
- prevQtd - current mode of processing a current line (0, 1, -1), sort of feedback as it can be returned by line
The lib/addon/hl_*.tcl files are easy to implement. Any of existing ones can serve as a sample.
Options
The alited's "Setup" menu provides "Projects", "Templates", "Favorites Lists" and "Preferences" dialogues.
All of the dialogues contain "Help" button, at their bottom left corners. The button displays a context help describing a current dialogue or its current tab. alited's helps are rather comprehensive.
alited's "Setup" menu provides some options outside of the dialogues, as described below.
Wrap Lines
This option allows to turn off the line wrapping.
It's rarely needed, so the wrapping is normally on. This option acts per a file.
This option allows to view an information of file attributes displayed in tips of the tab bar and the file tree.
Tips on / off
The Tips on / off submenu items allow to switch on / off the tips for various dialogues and widgets.
If you regard some tips as useless or troublesome, you can switch them off.
For convenience' sake, click the top "---" item to set the submenu "tear-off". All of alited's submenus can be set tear-off. Useful for multiple choices.
This option allows to change a tint of a current color scheme. It's per a session only.
When all of sudden you get a feeling that too much of light / darkness is around, this option might help.
This option allows to set command(s) that would be executed just after starting alited.
You can set as many commands as you like, one command per a line.
The commands may be Tcl/Tk commands or external executables, e.g.
cd ~/TMP
rm log.txt
package require fsdialog
after 1000 ::alited::raise_window
These commands are sort of initialization depending on a type of projects (i.e. on a configuration described in First start section).
Or, as in the example above, you might prefer fsdialog instead of Tk's file/dir choosers used in Linux.
In Setup / Configurations dialogue, you are offered to choose a configuration directory where alited stores its settings.
The default directory (~/.config) is probably the best choice if you don't plan to have several types of projects at your machine.
When you use the default directory, you may not pass it to alited as its first argument. On the other hand, if you choose some other configuration directory, this directory's name may be passed to alited as its first argument.
You can have several copies of your configuration directories, e.g. ~/.config1, ~/.config2 etc. each of them customized for its own type of projects: public/private, for work/fun and so on. For example, you can develop some fun projects with "Florid" color scheme and a funny font for editing. Or hobby projects with other settings. At last, work projects with "tough-stuff" settings:)
Anyhow, in Setup / Configurations dialogue, alited shows you where it stores its settings, so that you can backup them along with other programs' ones. Also, in the dialogue, you can switch to a configuration directory "on fly".